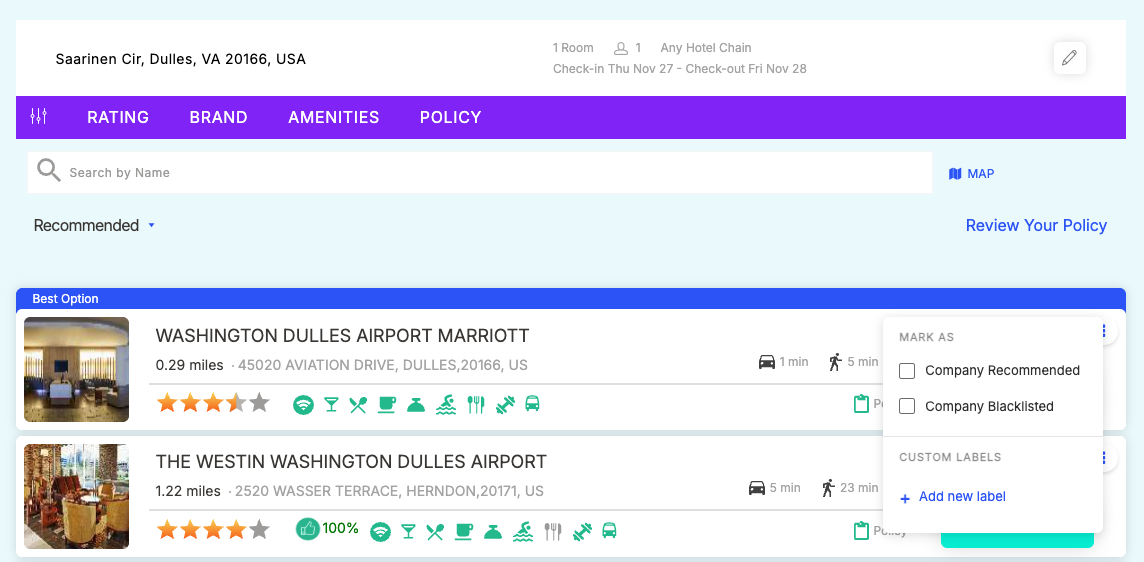
How to Add and Use Custom Labels for Hotels?
Custom labels let your company create its own hotel categorization system inside Routespring. These labels help teams identify the right hotel for specific needs—crew travel, corporate rates, safety requirements, proximity to offices, and more.
Once labels are applied, they appear directly on hotel cards and can be used as filters during search to quickly narrow down options.
This guide explains how to create custom labels, assign them to hotels, and filter results based on your internal categories.
What Are Custom Labels?
Custom labels are tags you define to match your company’s operational needs. These labels make it easier to:
-
Highlight safety-verified hotels
-
Identify crew-friendly or contracted properties
-
Mark hotels near offices, training centers, or airports
-
Tag hotels for specific trip types like events, projects, or client visits
-
Manage overflow, backup, or VIP hotels
-
Categorize hotels based on amenities or location
-
Flag hotels that require special handling (e.g., blackout dates, pre-approval)
Custom labels appear under the CUSTOM LABEL filter tab and on each hotel card.
Examples of Custom Labels Companies Commonly Use
Below are real-world use-cases companies often define:
1. Crew Travel & Operations
-
Crew Friendly
-
Scheduled Overnights
-
Longterm
-
Short Layover
-
Late Checkout Eligible
-
Emergency Backup Hotel
-
Standby Crew Hotel
2. Safety & Compliance
-
High Safety Rating
-
Verified Fire Safety
-
24/7 Security
-
Female Traveler Friendly
-
Safe Neighborhood
-
FEMA-Approved
3. Contract & Rate Based
-
Contracted Property
-
Negotiated Rates
-
Preferred Vendor
4. Location-Based
-
Close to Airport
-
Close to Office
-
Near Training Center
-
Near Convention Center
-
Walkable Area
5. Trip Purpose-Based
-
Sales Travel
-
Client Visits
-
Project Stay
-
Training Accommodation
-
Conference Hotel
-
VIP Stay
6. Operational Management
-
Overflow Hotel
-
Backup Option
-
High Satisfaction
-
Budget Hotel
-
Premium Stay
-
Review Required
7. Policy or Risk
-
Blacklisted
-
High Incident Reports
9. Seasonal or Temporary
-
Winter-Safe
-
Recently Renovated
-
Seasonal Contract
-
Construction Nearby
10. Team-Specific or Internal Tiers
-
Tier 1 / Tier 2 / Tier 3
-
Gold / Silver / Bronze Partner
These examples help illustrate how powerful and flexible custom labels can be for different departments—crew ops, procurement, HR, travel management, and safety teams.
How to Add a New Custom Label

-
Search for any hotel.
-
On the hotel card, click the three-dot menu (⋮).
-
Scroll to Custom Labels.
-
Click + Add new label.
-
Type the label name (e.g., “Crew Friendly” or “Close to Office”).
-
Save.
Your label is immediately available to assign to all hotels.
How to Assign a Label to a Hotel
-
Open the hotel card’s three-dot menu (⋮).
-
Under Custom Labels, check the labels you want to apply.
-
The label will instantly appear on the hotel card.
You can apply multiple labels to the same property.
How to Remove a Label From a Hotel
To untag a hotel:
-
Click the three-dot menu (⋮).
-
Uncheck the label.
This removes the label only from that hotel (not from the entire system).
How to Filter Hotels by Custom Labels
Custom labels make it easy for teams to quickly find the right hotels.
To filter:
-
At the top of the search page, open the CUSTOM LABEL filter tab.
-
Select any label (e.g., Crew Friendly, Contracted Property, Free Breakfast).
-
Search results will refresh to show only hotels with that label.
This is especially useful for:
-
Crew scheduling needing Scheduled Overnights hotels
-
Client-facing teams looking for Preferred Vendors
-
Travel managers searching for Safe Neighborhood properties
-
Project teams needing Longterm or Kitchenette hotels
Who Can Create or Modify Labels?
-
Admins & Travel Managers – Can create, assign, and remove labels
-
Travelers – Can view labels but cannot create, assign or remove labels
Best Practices
-
Use short, clear label names
-
Apply labels consistently across all properties
-
Review labels periodically to keep them relevant
-
Group similar labels for consistent filtering (e.g., “Close to Airport” vs “Airport Proximity”)
Topic Participants
Agent Admin